50/50 Method
SHORT VERSION
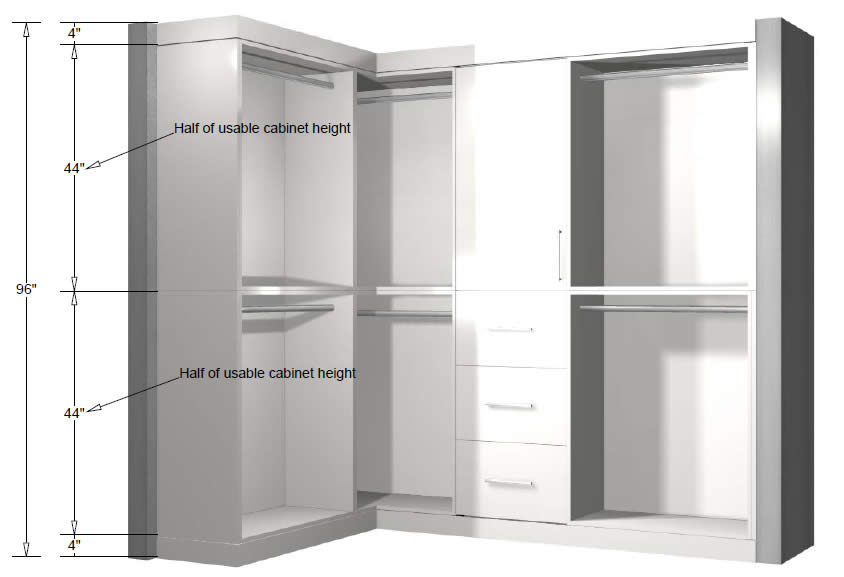
- Cabinets are equal in height, divide your "usable cabinet height" (ceiling height less crown molding and base molding heights) in half, to allow for two rows of closet cabinets
- Crown molding can be 2" to 6" tall. We used 4" for this example. Taller crown molding is better for ceilings that are not level. Note: Shorter crown may "draw the eye" to imperfections when installation of cabinets is completed.
- Base Molding should be 4" to 8" tall. We used 4" for this example. Note: If you have existing base molding in the room, you may consider making the closet base 1" to 2" taller than your existing room base molding (this makes for easier installation as you don't have to remove existing base molding during your install). Install closet cabinets above the existing base molding. This allows the closet base molding to die off into the face of the room's existing base molding. Use a small coping saw (home depot) to contour the end of the base molding and minimize the seam where they meet.

LONG VERSION
1. Lets start by adding some "leveling boards" (any piece or straight plywood, MDF, lumber, or regular board (typically 2" tall, 90" long, and 3/4" thick) to the wall. The leveling board is temporary and is only used to aid and facilitate a super easy cabinet installation. Using any sort of plywood or straight piece of wood-like material, you can create a level "lip" that allows you to install the lower row of closet cabinets perfectly level without having to check each cabinet with a leveling tool during installation.
I prefer to add one screw to the middle of the ledger board attached to a wall stud that is toward the center point of the board itself. Measure up from the finished floor, or carpet, by 4" (or however tall you choose to make your closet base molding), mark the wall with a pencil. Next, hold the board up horizontally and secure it to the wall using some drywall screws; My personal favorite screw, drywall screws should be long enough to get at least 1" into the lumber of the wall stud; a 3" long black drywall screw is commonly used by professional cabinet installers and are widely lauded for their holding strength, durability, and longevity; "coated decking screws" work as well, but they are a bit overkill as this area will likely never get wet. Tighten until snug. It will stay put as you use your level to find the correct position of the board. Move the left and right sides up and down until your "bubble level" is perfectly leveled. Next, add a couple more screws to the left and right side where wall studs intersect with your leveling board. This will result in a perfectly level "lip/edge" of which you will now be able set the lower row of closet cabinets atop.
SIDE NOTE: If you are installing your cabinets less than 2" above your existing base molding, then you can attach your leveling board to the face of your existing room's base molding. Using a 3" long drywall screw and screw through the face of the leveling board, base board, drywall, and finally into the wall stud. The long screws will securely hold your leveling board to the face of existing base molding while you proceed to install your cabinets above. Understand that your existing room's base molding is likely not level, so you will want to avoid the mistake of installing your cabinet on top of that irregular, non-leveled surface.
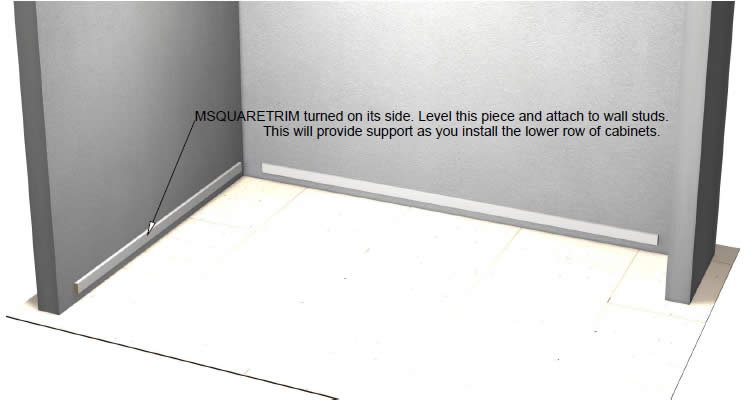
2. Once the leveling board is installed and leveled, you can simply pick up your lower row of cabinets and place them atop the ledger board one-by-one. This will hold them up off the floor at a perfectly level 4" elevation. Drill through the nailers (plywood cross rials at the rear of the cabinet) using your drywall screws and attach the cabinet to wall studs for a super sturdy hold. Once the bottom row is installed, you can then remove the leveling board, or simply leave it in place for added support.
TIP: Use 1.25" long drywall screws to attach cabinets together from the cabinet interiors. The closer to the face of the cabinet case you can place each screw (usually only one or two screws are all that is needed) the smaller/less noticeable the seam will be between each cabinet. Do this prior to attaching to the wall studs for a perfect seam between cabinets. I prefer to hide the screw heads in an area where they will not show, like the interior of a drawer cabinet, or behind the hinge plate where the cabinet doors attach to the cabinet case. This is optional, of course, and can be done in the future after install is completed, but the end result is a tighter and more seamless look.
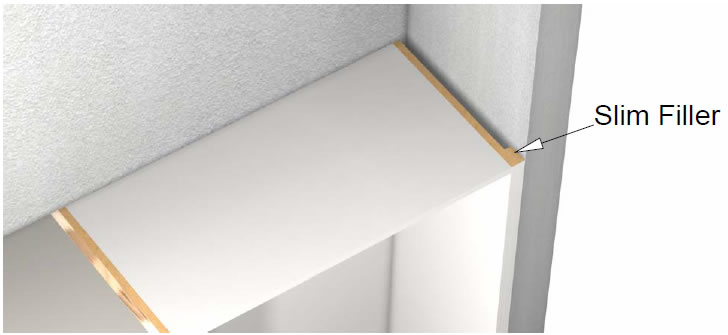
3. A slim filler should be used between your wall and cabinets. This 3/4" gap will ensure a smooth installation and prevent issues resulting from measurement and other unforeseen errors.
SIDE NOTE: If you don't use a filler, you may run into issues with your cabinet run being too wide, too small, or the doors and drawers rubbing the wall when they are opened. The filler is a great "safety net" that gives you some options if something goes wrong during install or design. We highly recommend ordering a filler to prevent having to do something drastic;9 like shaving a cabinet down, re-ordering cabinets, or removing drywall to gain a little extra space.
4. Install the upper row by simply setting them on top of the base cabinets. I prefer to clamp them to the base cabinet prior to screwing them to the wall studs. This allows me to align the faces to minimize any seams. Once the top and bottom row is clamped, use some 1.25" long decking or drywall screws to attach the lower cabinets to the upper cabinets (I prefer to screw up through the top of the lower cabinet into the bottom of the upper cabinet). This will prevent noticeable gaps between cabinets limiting seams at the face where they touch. Next, attach the upper cabinet row to the wall studs using the same method as described above. Remove clamps and the cabinets should now be secure to the wall as well as secured to each other.
5. Any exposed cabinet sides should be covered with a finished end panel. Finished end panels allow you to cover any construction holes with the a matching material for a nice look. End panels are typically ordered at the same height as the cabinet it is attached to.
SIDE NOTE: Exposed cabinets (e.g. cabinets with the interior always exposed, like a hanging rod or open shelf closet cabinet) should have an end panel ordered at the same depth as the cabinet itself. Door and drawer cabinets should have the end panels ordered at the DEPTH plus 13/16". Example of this would be a 17" deep one door closet cabinet having a 17.8125" deep end panel attached. The doors are not included in the cabinet DEPTH dimension. Ordering the end panels deeper will allow the face of the door to be flush to the face of the end panel. This creates a very nice and clean look that is the hallmark of the Barker Modern closet line :)

6. Optional XTFOOT can now be installed. The XTFOOT is used for extra support and will not really be carrying any weight as the cabinets are already secure to the wall studs. The XTFOOT allows for a removable toe kick and crown molding, which is nice because the crown and base will simply "click" onto the XTFOOT with the clips provided. To install you can screw the XTFOOT to the top of the cabinet if you wish, but I prefer to tighten it to the ceiling and simply allow the tight pressure keep it in place. This allows you to modify the crown forward and back rather easily by simply loosening the XTFOOT and re-positioning it above and below the cabinets as needed. You don't need a bunch of feet all over the cabinets here, that would be overkill. A minimum of two feet per run of cabinet is all that is needed to hold crown and base molding in place. The nice thing about these feet is that they are removable and require almost no skill to install. Since they are removable, you can use the openings as a hidden storage area for valuables ;)
7. Lastly, you can now add the decorative base molding and crown molding to the cabinets. These pieces are cut to appropriate lengths on-site, by the customer, using a normal chop saw. Only a few cuts and you are done. Congrats!
POST SCRIPT AND SUMMARY: The clip-on base and clip-on crown will have slight gaps at the seams and where they connect to side walls, and where they connect to the tops and bottoms of the cabinet cases. Feel free to use standard millwork from our kitchen category, these moldings are pin-nailed into place using a backer and a face piece. That is not what we were shooting for on our closet line. We are going for a less-than-one day installation here. Think of a weekend project where the closet cabinets are delivered on a Friday, you assemble and install them on Saturday, and marvel at the awesomeness on Sunday! Have fun with your design using any of our extensive library of custom closet cabinets wherever you wish. Closet cabinets can be placed side by side in any order you desire creating "lego like" stacking and side-by-side placement options. Have fun and enjoy yourself :)
|
|
|

